Table of contents will be automatically generated here...
Bag and mask ventilation
Self-inflating bags (LAERDEL AIR VIVA CIRCUITS) are available in three sizes:
- 250ml: Newborn or small neonates ONLY
- 500ml: Neonates - infants
- 1500ml: Infants-adults
- The two smaller sizes generally have a pressure-limiting valve, set at 4.41 kPa (45cmH20). This may (rarely) need to be over-ridden for high resistance/low compliance lungs, but it protects normal lungs from inadvertent barotrauma.
- The patient end of the bag connects to a one-way valve of a fish-mouth or leaf-flap design.
- The opposite end has a connection to the oxygen supply, and to a reservoir attachment.
- The reservoir enables high oxygen concentrations (up to 98% FiO2) to be delivered.
- Without it, it is difficult to give the patient more than 50% FiO2,whatever the fresh gas flow.
A significant amount of pressure is required by the patient to be able to open the "one way" valve.
Therefore, using these circuits without squeezing the bag should be avoided in spontaneously breathing children, to avoid asphyxiation.
In the breathing child who displays poor respiratory
effort, assistance to breathe can be given by squeezing the bag with each breath. The squeezing action of the bag is what opens the one-way valve to release the high FiO2.
These bags must only be used to assist
ventilation and not in the spontaneous ventilating child who is not
being assisted.
Mask
Choose a suitable-sized mask:

Mask sizes
In the infant:
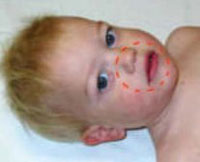
It should fit:
- Around the mouth and nose
- Away from the eyes
- Just below the lips in the dip before the chin
In the child:
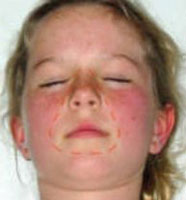
It should fit:
- Around the nose and mouth.
The bag and mask ventilation technique
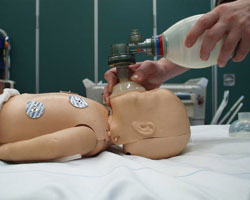
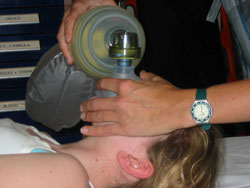
- Place the patient in the supine position.
- Fix the appropriate-sized mask to the bag.
- Connect the oxygen tubing with 15litres flow to the circuit.
- Ensure equipment is functioning correctly (inflation of reservoir and opening of leaf-flap valve on squeezing of bag - ideally done as a routine check)
- Apply the mask to the patient's face, establishing a good seal.
- Assess effectiveness of ventilation, then continue. (May need to increase or decrease application of jaw thrust.).
Infant bag and mask ventilation:
Child bag and mask ventilation:
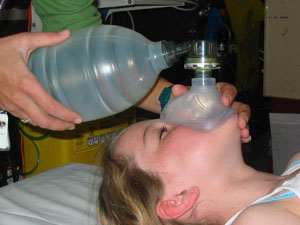
Needle thoracocentesis
Indicators:
Rationale
- To release trapped air which is progressively accumulating in the pleural cavity collapsing the ipsilateral lung and compressing the contralateral lung.
Equipment Required
Placement
Mid-clavicular (opposite side to deviated trachea), second intercostal space.
Procedure
- Place patient on continuous cardiac monitoring;
- Place patient in a head-up, supine position
- Palpate landmark again and surgically prep.
- Puncture the skin at the level of the upper border of the 3rd rib in the midclavicular line.
- Direct the needle caudally at a 45 degree angle.
- Carefully insert the needle into the pleural space. Often you will hear a pop or feel a change of resistance.Withdraw the needle while gently advancing the cannula downwards into position.
- Plan for chest drain (intercostal catheter insertion)
Surface markings Needle insertion:
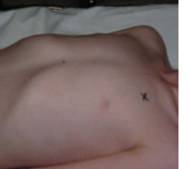
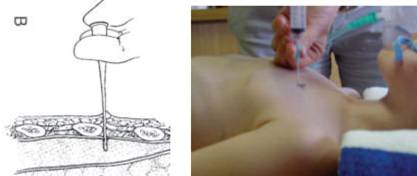
Intercostal Catheter (ICC) and Under Water Sealed Drainage
(UWSD)
Rationale
- Fluid or air that accumulates in the pleural space will reduce lung expansion and lead to respiratory compromise and hypoxia.
- Insertion of an I.C.C. enables drainage of air or fluid from the pleural space, allowing negative intra-thoracic pressures to be re-established leading to lung re-expansion.
Indicators
- Pneumothorax:
- Haemothorax.
Equipment Required
- Local anaesthetic and analgesia are mandatory, as chest-tube placement is a painful procedure.
- Suction must be available and working.
- Special procedures tray:
- Under water sealed drain system UWSD
- Intercostal Catheter -Newborn 8-12 FG -Infant 12-16 FG use smaller size for draining air.
- Child 16-24 FG Larger size for draining blood/fluid -Adolescent 16-24 plus FG
- Spigot connector / tube adaptor - 2 sizes
- Sterile gloves & gown
- Mask
- Sterile towels x 2
- 500ml bottle of sterile water
- Betadine solution
- 1% lignocaine ampoule
- 5ml/10ml syringe and needle
- Scalpel blade
- Suture material - black silk with needle size 3.0 x 2
- Sleek and Tegaderm x 2
Procedure
- Establish patient on continuous cardiac monitoring
Surface markings for ICC:
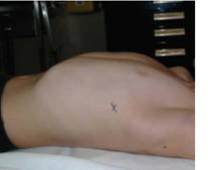
- Place patient in a supine position With arm of same side placed above head
- Palpate the fourth or fifth intercostal space in the mid-axillary line at the level of the nipple.
- Surgically prepare the area.
- Ensure local anaesthetic is infiltrated from subcutaneous tissue down to pleura.
- (Max dose of lignocaine 3 mg/kg = 0.3ml/kg of 1% lignocaine)
- Select the appropriate size I.C.C. and remove stylet
(the stylet can damage lung, vessels and the heart if used as an
introducer).
- Incise the skin parallel to the top border of the rib below the chosen intercostal space. Incise down to the fascia.
- "Blunt dissect" (using an artery forcep) down to the pleura, enter the pleural space, and then widen the hole by opening the forceps.
- Sweep the pleural space with a gloved finger to widen the hole and push the lung away from the hole (only possible in older children).
- Hold the tip of the catheter with a curved artery clamp and advance it into the pleural space, directing the catheter posteriorly and superiorly.
- Attach the tube to UWSD below the patient's chest level
- Anchor the drain with 3.0 suture. You may insert purse-string or z-stitch in anticipation of removal. Tape in place with tegaderm sandwich and anchor the tube to the patient's side.
- If suction is required connect UWSD to wall suction until gentle bubbling appears in the suction control section.
- Watch for "swinging" of water in tube connection.
- Reassess need for analgesia.
- In children following the removal of the tube coverage with a large tegaderm is sufficient for closure rather than a formal purse string suture.